Begin your journey with Argo CD, Kubernetes Cluster, Microservices Web Application, and establish the architecture using Helm Chart

Embarking on a journey into the realm of modern application deployment and orchestration requires a solid foundation, and there’s no better way to commence this adventure than with Argo CD, Kubernetes Cluster, and the dynamic landscape of microservices web applications. In this blog, we’ll guide you through the essential steps of setting up a robust architecture using Helm Chart, a powerful Kubernetes package manager.
Whether you’re a seasoned developer exploring new technologies or a tech enthusiast eager to delve into the world of containerized applications, this guide will serve as your compass, navigating you through the intricacies of Argo CD and Kubernetes to establish a resilient and scalable infrastructure for your microservices web application. So, buckle up as we dive into the intricacies of this transformative journey, laying the groundwork for a seamless and efficient deployment experience
1. Introduction to Kubernetes (k8s)
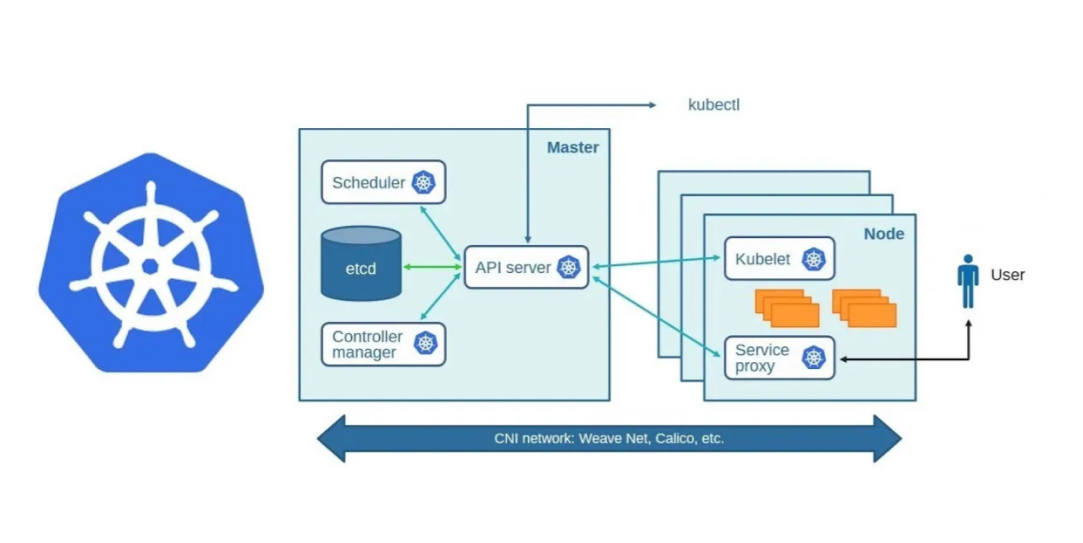
Let’s imagine you’re managing a big party with lots of food and drinks. Kubernetes is like a party planner that helps you organize everything seamlessly.
1. Master Node
API Server
This is like your party planning office. People come in with requests (like more food, and less music), and the API Server processes these requests, ensuring everything stays organized.
etcd:
This is your party’s memory. It keeps track of everything — how many pizzas are left, who’s dancing, and so on.
Controller Manager
Think of this as your rule enforcer. It makes sure there are enough snacks, drinks, and space for everyone.
Scheduler
This is your seating manager. When new guests arrive (new containers), it decides where they should sit (which server they should run on).
2. Node (Minion) Nodes:
Kubelet
This is like the waiter. It ensures that every dish (container) is served correctly. If something goes wrong, it informs the party planner (API Server).
Container Runtime
This is the kitchen staff. It’s responsible for preparing and serving the dishes (running the containers).
Kube Proxy
This is your traffic controller. It makes sure people (containers) can talk to each other and that guests (pods) can be reached from outside.
3. Pods
These are your guests. Each pod represents one person (or process) at the party. A pod can have multiple containers (friends) who share resources.
4. Controller
This is like a manager overseeing a group of friends. If a friend leaves, the manager ensures another friend joins to maintain the group size. This keeps things stable and fun. Different types of managers (ReplicaSet, Deployment) handle different groups.
5. Service:
This is like a lounge area with a name. Instead of looking for friends in the crowd, you go to the lounge with a sign that says “Pizza Lovers,” and you find everyone who loves pizza there.
6. Namespace:
This is like dividing the party venue into sections. Each section can have its own music, snacks, and guests, so different groups don’t interfere with each other.
In essence, Kubernetes makes sure your party runs smoothly, with enough food, space, and coordination, while allowing different groups to enjoy their own experiences.
2. Monolithic vs. Microservices Architecture
Monolithic is like a giant cake; Microservice is cupcakes — one big structure vs. smaller, independent parts for flexibility.
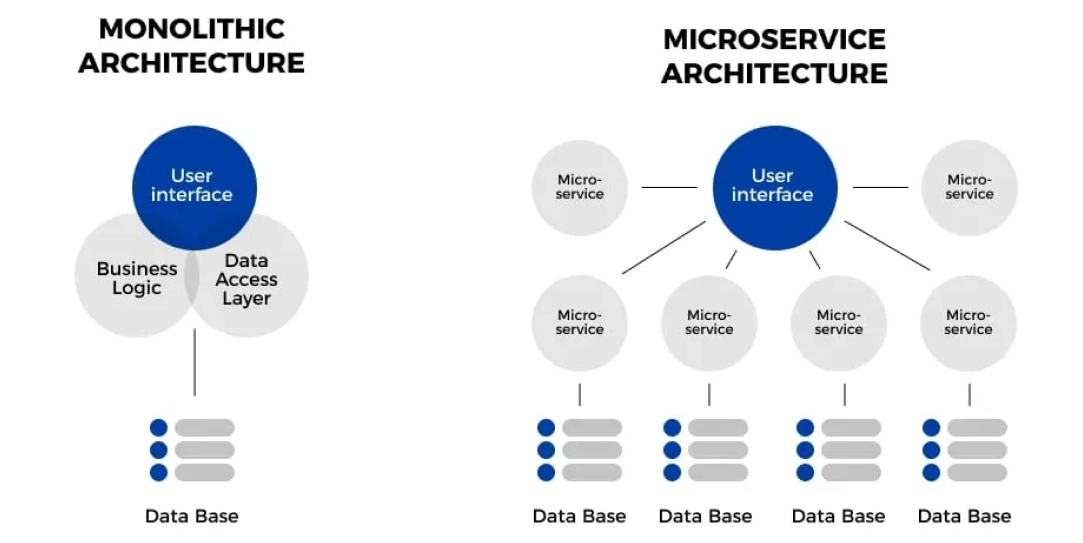
Monolithic Architecture Example
Imagine you’re building a software application like a shopping website. In a monolithic approach, everything — from handling user requests, managing the product catalog, processing payments, to displaying the website — is tightly bundled together. If you need to update the payment system, you might have to modify the entire application, potentially causing disruptions.
Microservice Architecture Example
Now, think about the same shopping website using a microservice approach. Instead of one big application, you have separate services for different functionalities — one for user authentication, another for product management, and a third for payment processing. If you want to upgrade the payment system, you can focus on that specific microservice without affecting other parts of the website.
3. Workflow Components in a Kubernetes Cluster

Presented is an illustration summarizing the process discussed in this article for deploying an application on Kubernetes locally.
4. Getting Started with Minikube
Minikube is a tool that enables you to run Kubernetes clusters locally on your computer. It’s particularly useful for developers who want to test and experiment with Kubernetes features without the need for a full-scale, production-like cluster.
https://minikube.sigs.k8s.io/docs/start/
After download minikube run the following command minikube start
5. Exploring Argo CD
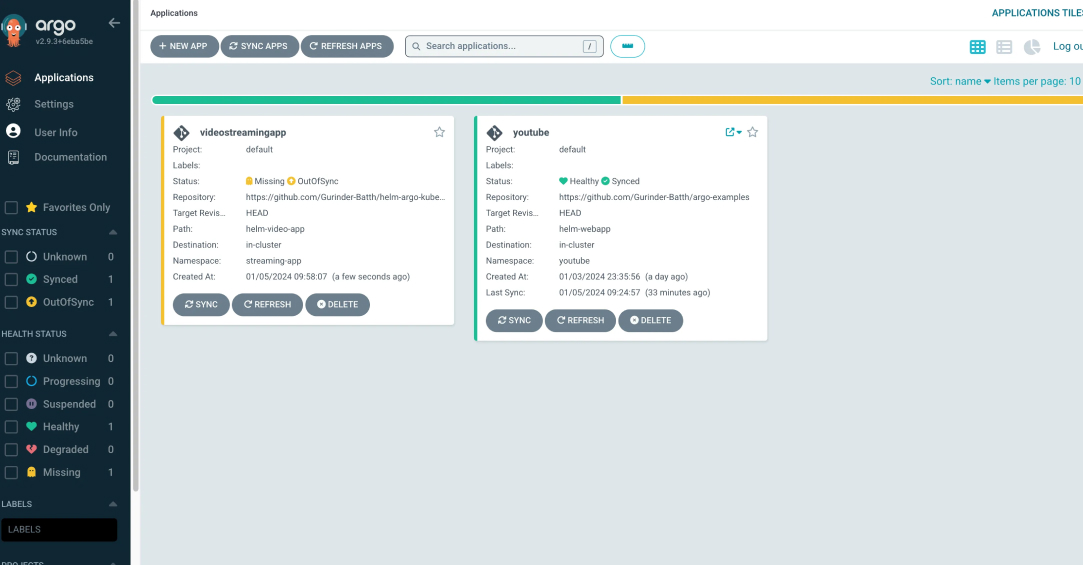
Argo CD is like a manager for your software. It makes sure everyone is using the right version and keeps things organized.
Imagine you have a team of chefs preparing a new recipe. Argo CD is like a head chef who checks that each chef is using the correct ingredients and following the recipe exactly. If any chef goes off track, Argo CD notices and helps bring everything back in line. This ensures that your dish (software application) is consistently prepared and ready to be served (deployed) without surprises.
How to install Argo CD
kubectl create namespace argocd
 kubectl apply -n argocd -f https://raw.githubusercontent.com/argoproj/argo-cd/stable/manifests/install.yaml
kubectl port-forward svc/argocd-server -n argocd 8080:443
# How to get argo cd password default username is admin
kubectl -n argocd get secret argocd-initial-admin-secret -o jsonpath="{.data.password}" | base64 -d
6. Microservices Architecture for Python Web Applications
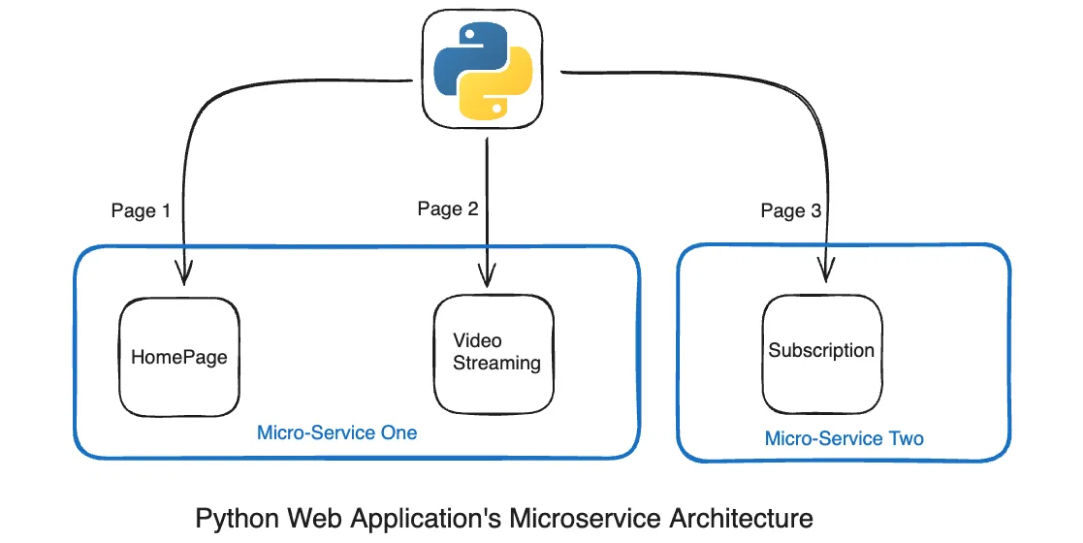
Imagine you have a Python web application with three pages: a home page, a video streaming page, and a subscription page.
Now, we want to deploy this application in a Kubernetes environment, treating each page as its own separate “mini” application. To do this, we use tools like Argo CD and Helm YAML.
Instead of deploying the entire application at once, we’ll split it into two parts. One part will be for the home page and video streaming, and the other part will be for subscriptions.
To make this work, we create two special packages called Docker images. These images are like snapshots of each part of the application. We give them unique names and store them on a platform called Docker Hub.
Then, in our Kubernetes setup, we use these Docker images to create what we call “pods” for each part of the application. These pods are like small, self-contained units that run our mini-applications.
The deployment and management of all this are made easier with tools like Argo CD and Helm YAML, which help organize and automate the process. So, in simpler terms, we’re taking our Python web app, splitting it into smaller parts, packaging those parts into Docker images, and deploying them as separate pieces in a Kubernetes environment using helpful tools.
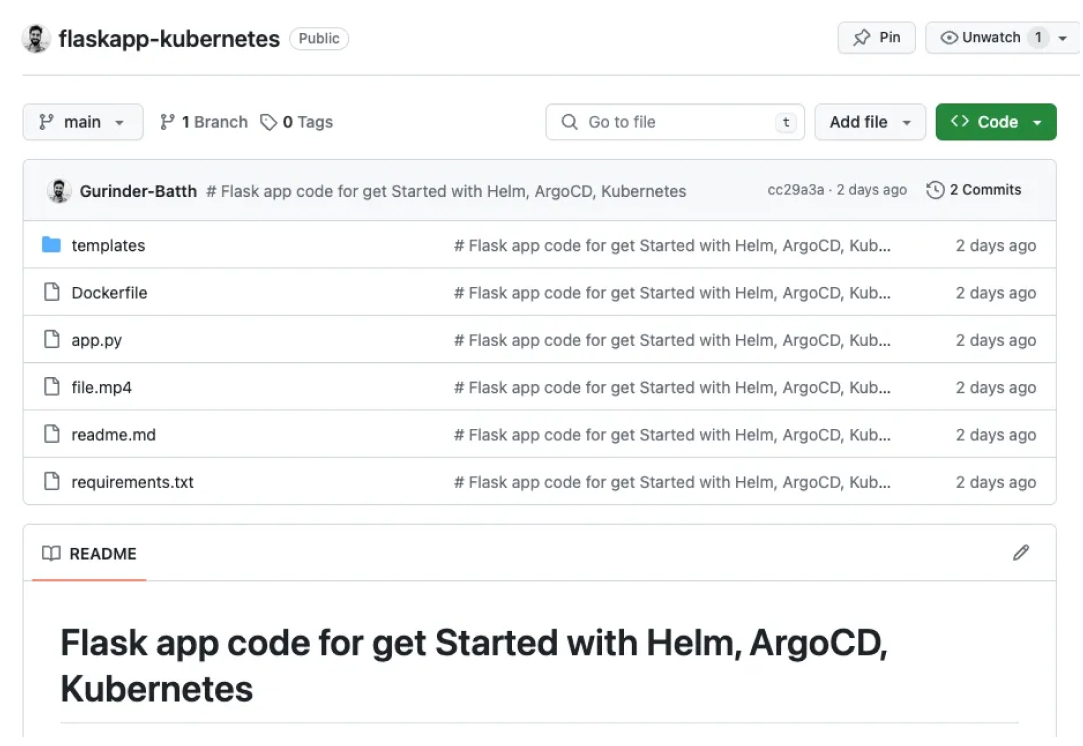
Python Web Application Github Source Code
https://github.com/Gurinder-Batth/flaskapp-kubernetes
7. Publishing Images on Docker Hub
How to publish these single application two images on Docker Hub. Ensure you have a Docker Hub account and local Docker installation. Then, log in to Docker using your terminal.
https://www.docker.com/products/docker-desktop/
Then clone the repo https://github.com/Gurinder-Batth/flaskapp-kubernetes and run the following command replace gurinderpal with your username
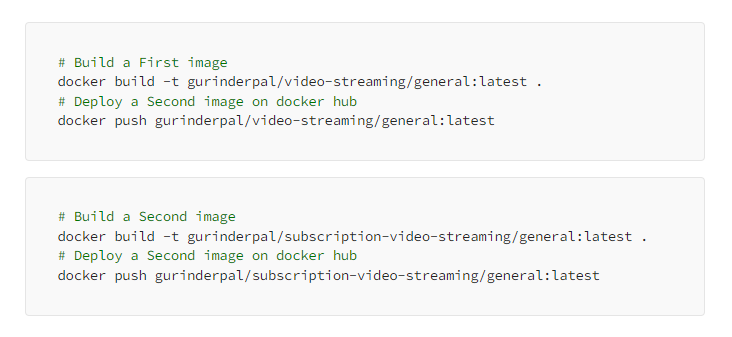
https://hub.docker.com/repositories/gurinderpal

8. Setting up a GitHub Repository for Our Application’s Architecture
Now, the next thing to do is set up the GitHub repository structure using a special plan called a Helm chart. This plan is like a set of instructions that Argo CD follows to create the different parts of our application in Kubernetes.
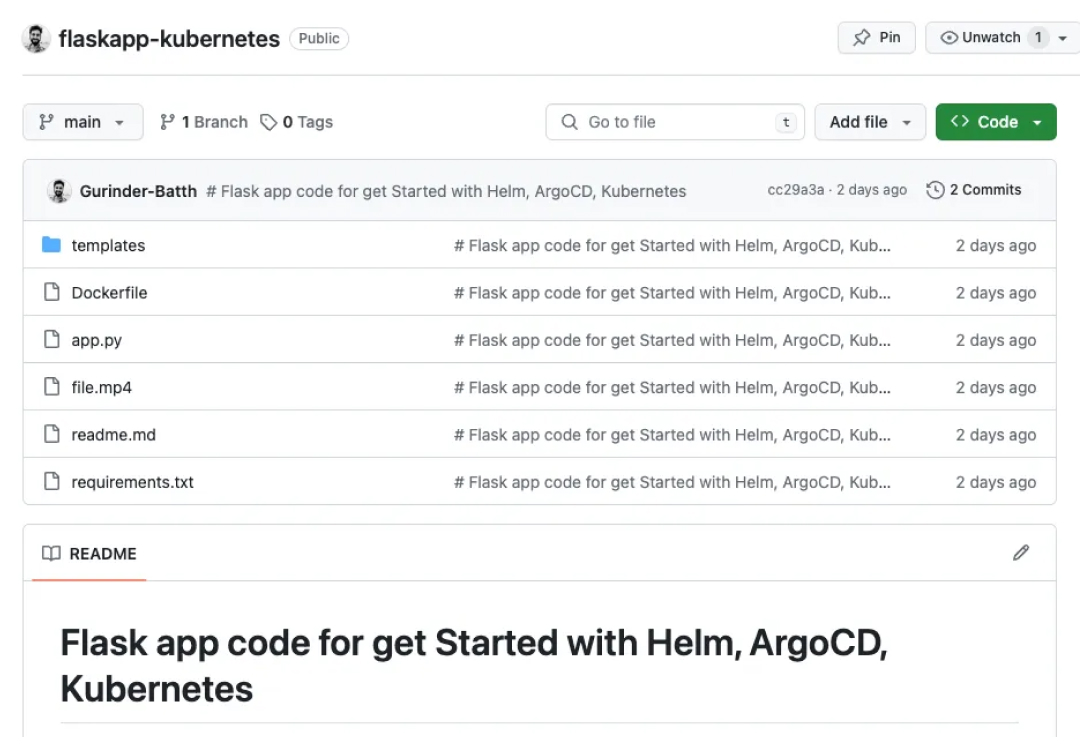
Here is the source code in my GitHub repository, which includes the entire setup for deploying the app on Kubernetes.
https://github.com/Gurinder-Batth/helm-argo-kubernetes
Let me explain some code of this architecture repo diagram.
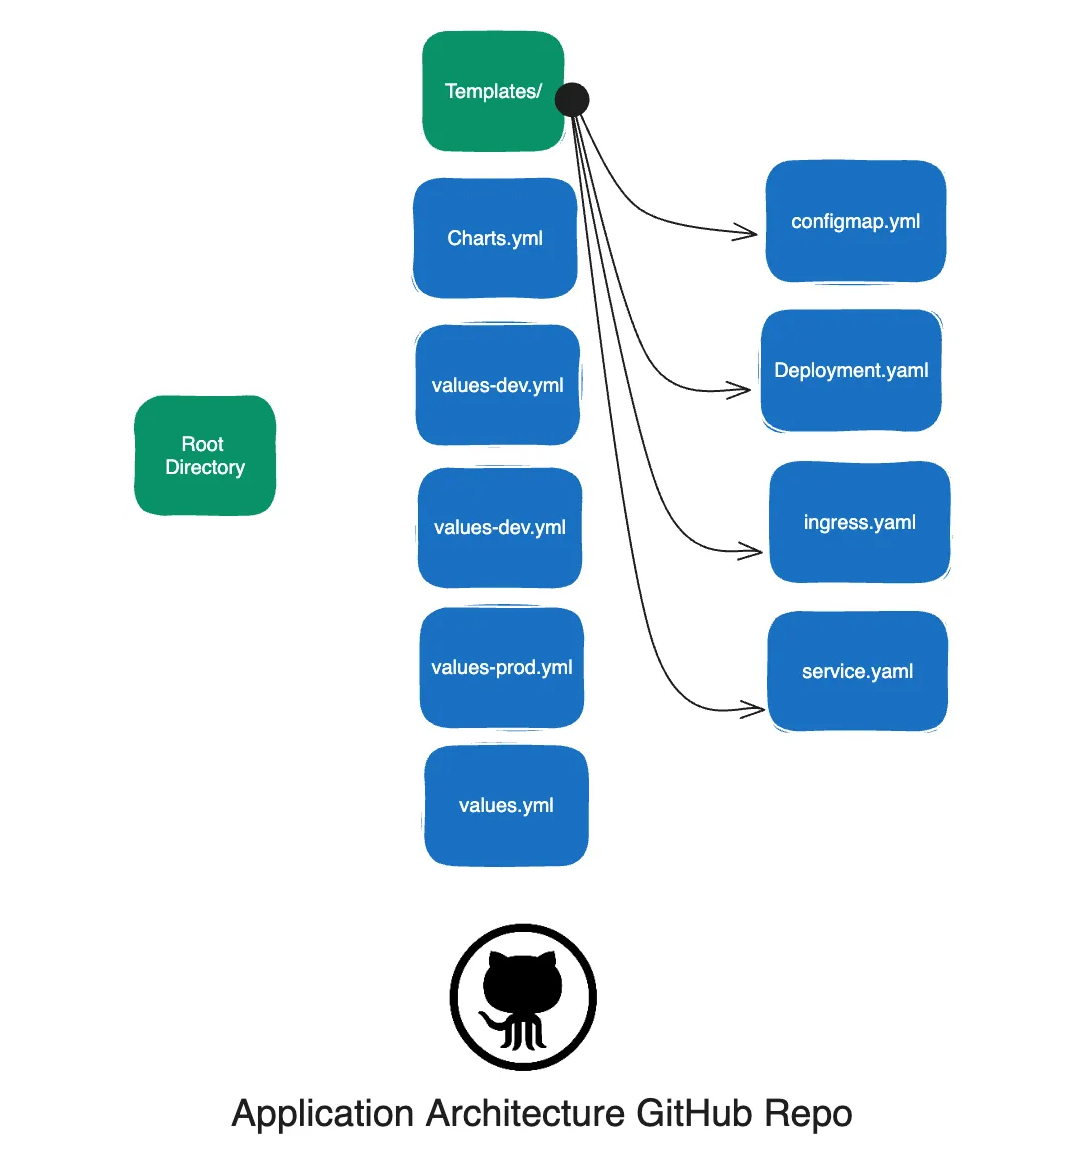
deployment.yaml
It describes how to run and manage a containerized application. It specifies details like the number of instances (replicas), container images, ports, environment variables, and resource limits. The configuration is written in YAML, and it uses placeholders ({{ .Values… }}) for dynamic values provided during deployment.
apiVersion: apps/v1
 kind: Deployment
 metadata:
 name: {{ .Values.appName }}
 labels:
 app: {{ .Values.appName }}
 spec:
 replicas: {{ .Values.replicas }}
 selector:
 matchLabels:
 app: {{ .Values.appName }}
 tier: frontend
 template:
 metadata:
 labels:
 app: {{ .Values.appName }}
 tier: frontend
 spec: # Pod spec
 containers:
 - name: mycontainer
 image: "{{ .Values.image.name }}:{{ .Values.image.tag }}"
 ports:
 - containerPort: 80
 envFrom:
 - configMapRef:
 name: {{ .Values.configmap.name }}
 resources:
 requests:
 memory: "16Mi"
 cpu: "50m"    # 500milliCPUs (1/2 CPU)
 limits:
 memory: "128Mi"
 cpu: "100m"
configmap.yaml
It describes setup the enviourment variable of pods.
# helm-video-app/templates/configmap.yaml
 kind: ConfigMap
 apiVersion: v1
 metadata:
 name: {{ .Values.configmap.name }}
 data:
 CUSTOM_VAR: {{ .Values.configmap.data.CUSTOM_VAR }}
ingress.yaml
This Kubernetes Ingress configuration routes external HTTP requests for `myhelmapp.example.com` to the service named `{{ .Values.appName }}` on port 80 when the path is “/”.
# File: myhelmapp/templates/ingress.yaml
 apiVersion: networking.k8s.io/v1
 kind: Ingress
 metadata:
 name: myhelmapp-ingress
 spec:
 rules:
 - host: myhelmapp.example.com
 http:
 paths:
 - path: /
 pathType: Prefix
 backend:
 service:
 name: {{ .Values.appName }}
 port:
 number: 80
service.yaml
This Kubernetes Service configuration exposes the “helm-video-app” on port 80, directing traffic to Pods labeled with “app: {{ .Values.appName }}” and “tier: frontend” using NodePort for external access.
# helm-video-app/templates/service.yaml
 apiVersion: v1
 kind: Service
 metadata:
 name: {{ .Values.appName }}
 labels:
 app: {{ .Values.appName }}
 spec:
 ports:
 - port: 80
 protocol: TCP
 name: flask
 selector:
 app: {{ .Values.appName }}
 tier: frontend
 type: NodePort
values.yaml
This Kubernetes Service configuration set the values default env and different env.
# helm-video-app/values.yaml
 appName: video
ingress:
 enabled: true
port: 80
configmap:
 name: video-configmap-v1
 data:
 CUSTOM_VAR: 'Get Started with Helm, ArgoCD, Kubernetes'
image:
 name: gurinderpal/video-streaming
 tag: latest
image_subscription:
 name: gurinderpal/subscription-video-streaming
 tag: latest
image_database:
 name: mariadb
 tag: latest
9. Creating Pods with Argo CD in Kubernetes Cluster
😆 The Final phase involves creating Kubernetes pods using Argo CD. Detailed steps, along with screenshots and a video, demonstrate the process of initiating a new application.
Youtube video Link: https://youtu.be/RrXgmMTFqUY?si=8NZMqNodN2L_QDCz
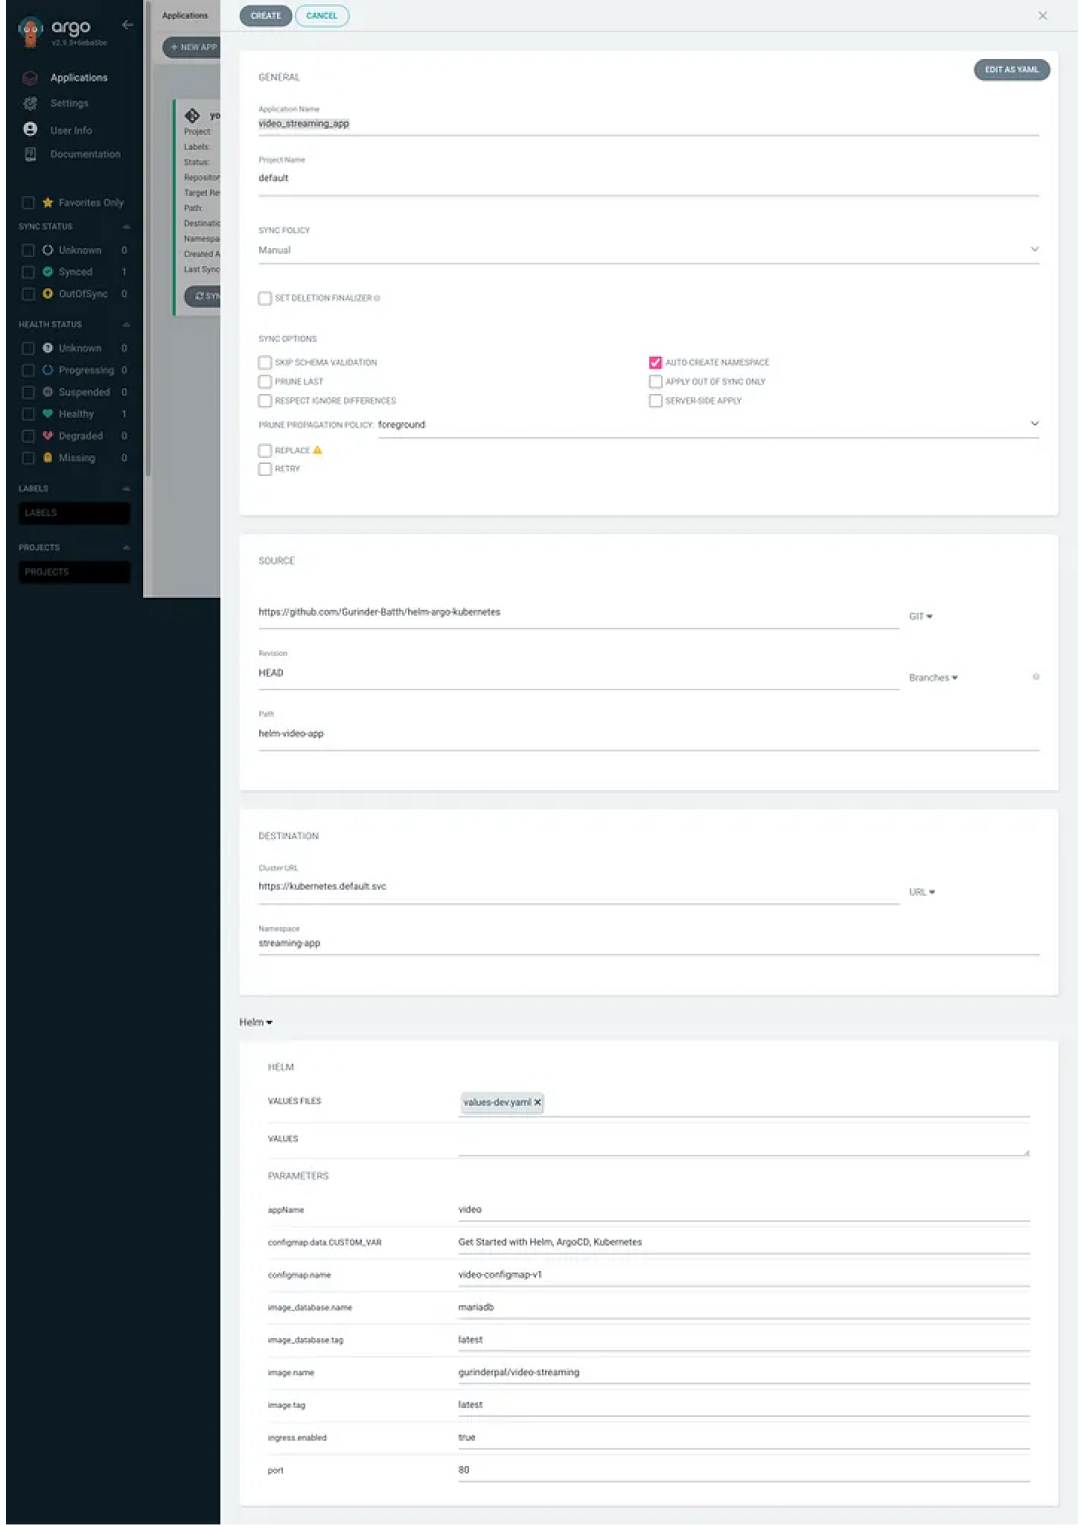
1. In the initial screenshot, we observe the appearance of the Argo CD app. Begin by clicking the “Create” button and entering details as shown in the image.
- Use lowercase for the application name.
- Enable automatic namespace creation.
- Set the GitHub repository as the source.
- Choose the default destination.
- Specify a unique namespace.
- Select the values-dev.yaml file for environment setup.
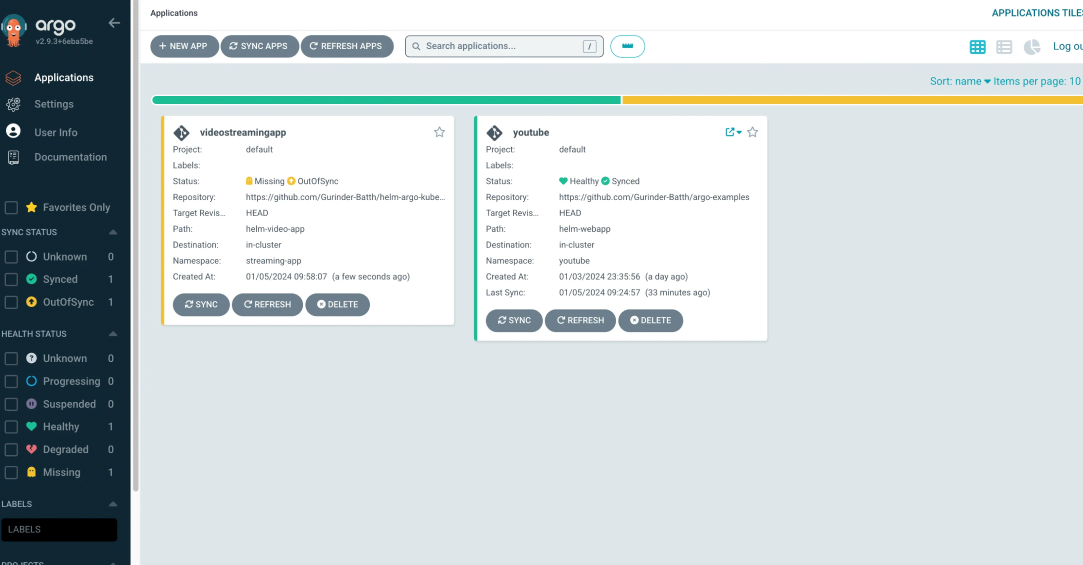
2. Next, name your new application “videostreaming.”
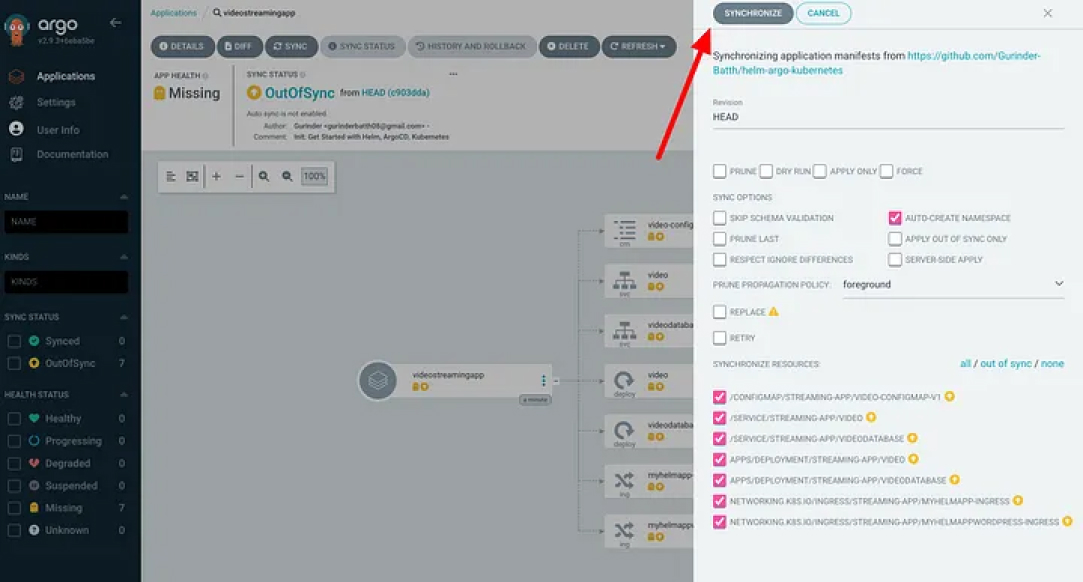
3. Navigate into this card and click the “Sync” button.
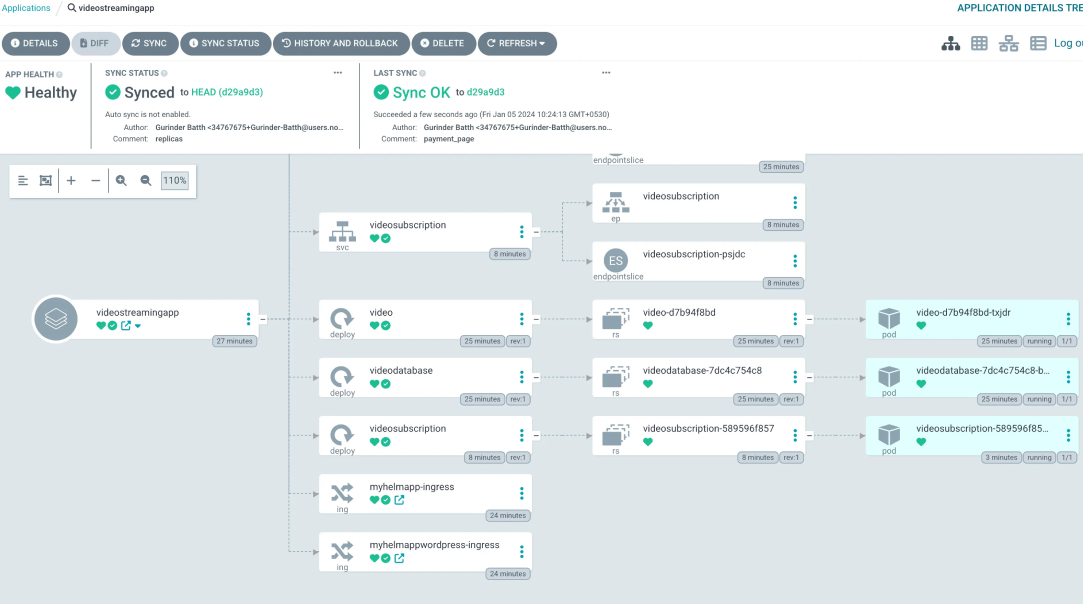
4. In the final screenshot, you can see the appearance of the cluster after synchronization.
10. Accessing the Application in a Web Browser
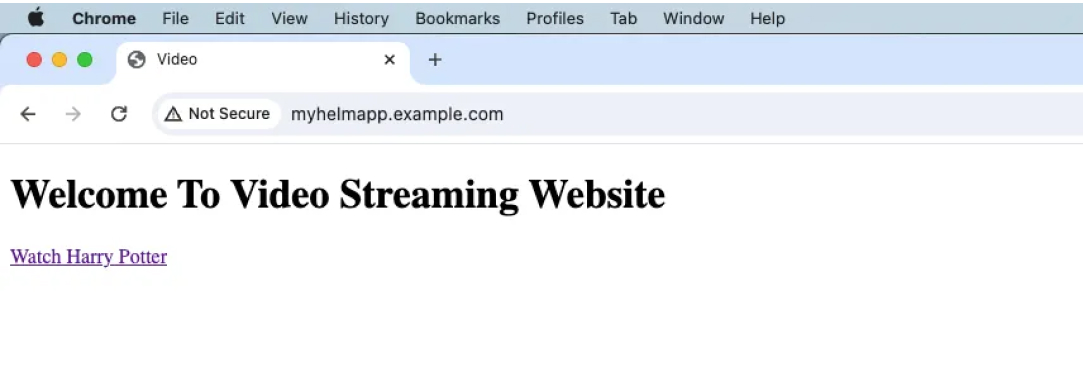
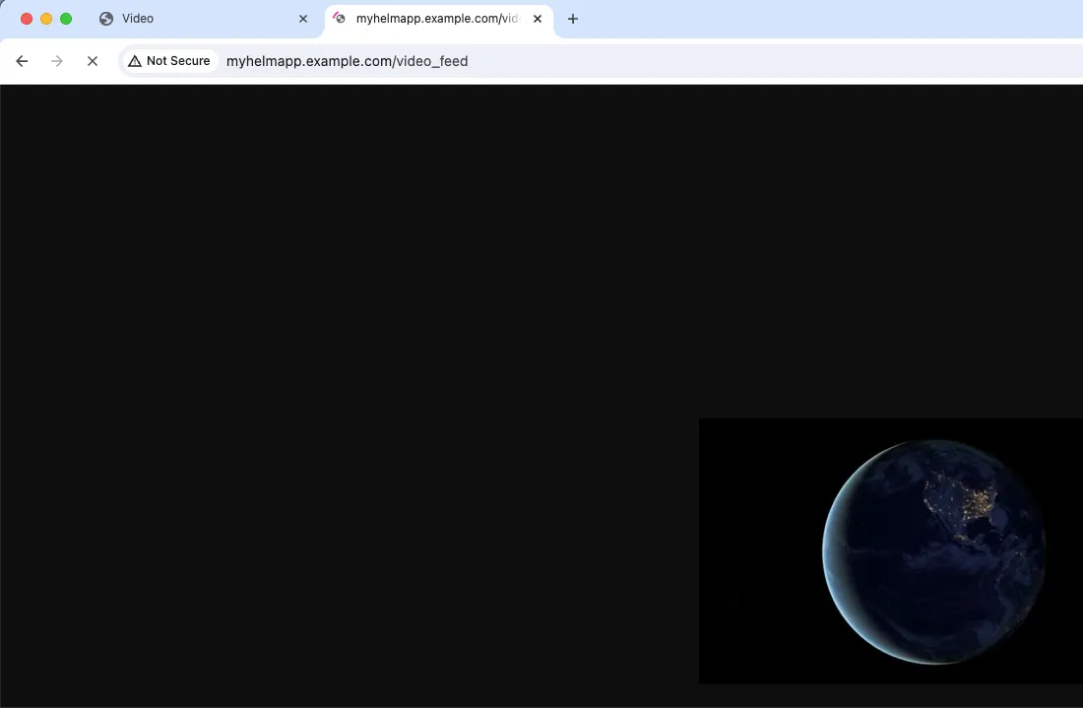
To access the application in a browser, you need to execute the “minikube tunnel” command.

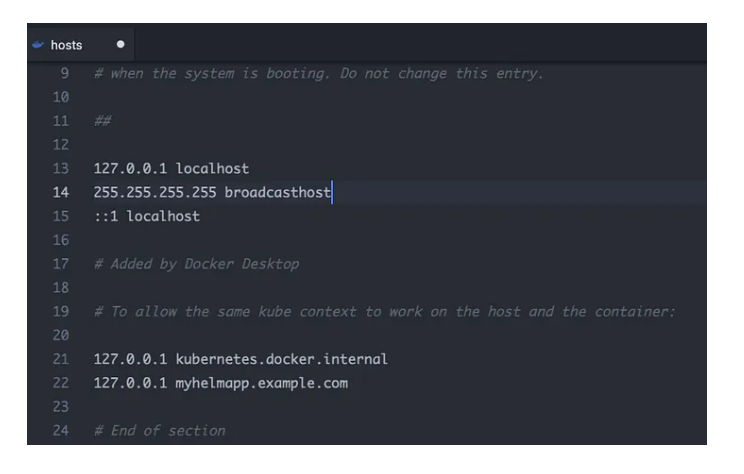
Next, modify the /etc/hosts file and add 127.0.0.1 for myhelmapp.example.com.
Finally, celebration time! 🚀🎉🚀

Let’s Wrap It Up!
Our exploration into Argo CD, Kubernetes Cluster, and the orchestration of a Microservices Web Application using Helm Chart unveils a powerful synergy that forms the backbone of modern application deployment. As we close this chapter, we’ve navigated through the intricacies of setting up a resilient and scalable architecture, empowering you to streamline your deployment processes.
LN Webworks expert team is ready to tailor solutions that meet your every need. Reach out to us now for Drupal project excellence and discover how we can help you with your web development projects.