Progressive Web Apps (PWAs) with Drupal: Enhancing User Experience

In the evolving landscape of web development, delivering seamless and engaging user experiences is paramount. Progressive Web Apps (PWAs) have emerged as a solution that combines the best of web and mobile applications. Integrating PWAs with Drupal can significantly enhance website performance and user satisfaction.
Understanding Progressive Web Apps:
PWAs are web applications that utilize modern web technologies to offer experiences similar to native mobile apps. They are designed to be reliable, fast, and engaging, providing functionalities such as offline access, push notifications, and home screen installation.
For a comprehensive guide, refer to the Progressive Web App (PWA) module documentation.
In this guide, we’ll cover everything you need to know about implementing PWAs in Drupal, from setup to optimization.
Why Implement a PWA in Drupal?
PWAs offer several advantages, such as:
⦁ Improved Performance: Faster loading times through caching.
⦁ Offline Access: Works without an internet connection using service workers.
⦁ Push Notifications: Re-engage users even when they’re not on your site.
⦁ App-Like Experience: Runs in fullscreen mode, supports home screen installation.
⦁ Cross-Platform Compatibility: Works on desktops and mobile devices.
With these benefits in mind, let’s dive into how to convert a Drupal site into a PWA.
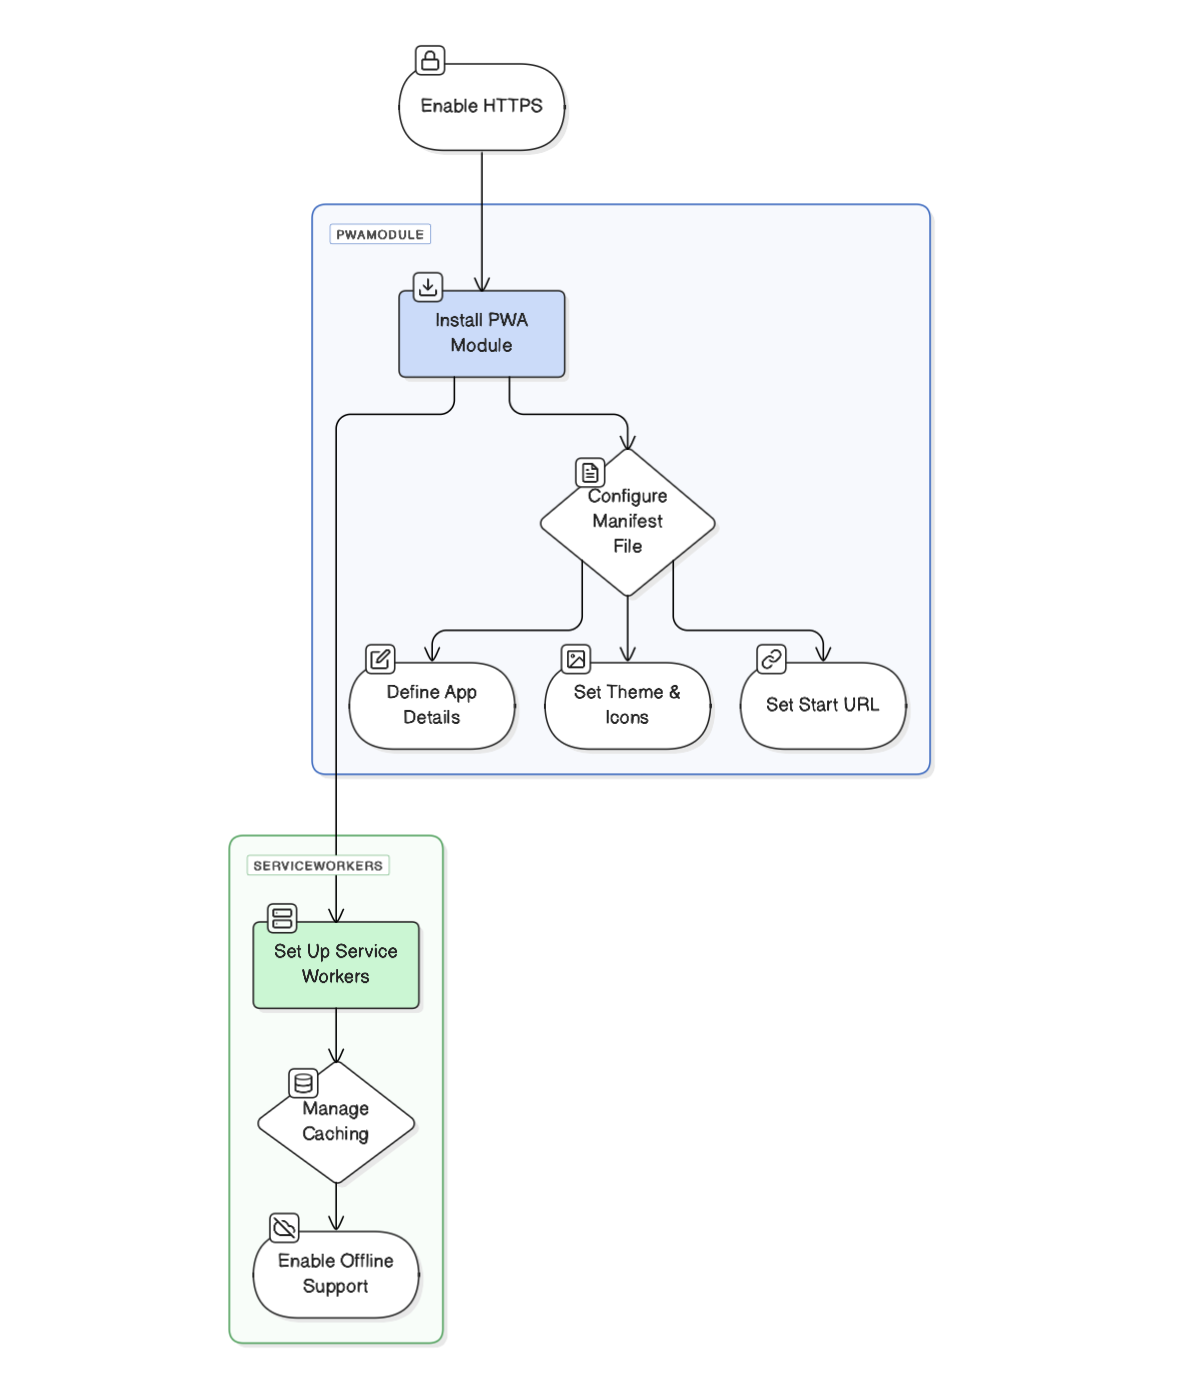
Step 1: Enable HTTPS
PWAs require a secure connection (HTTPS) to function correctly, especially for service workers and caching.
How to Enable HTTPS in Drupal:
- Obtain an SSL certificate from Let’s Encrypt, Cloudflare, or your hosting provider.
- Enable HTTPS in Drupal using the .htaccess file:
RewriteEngine on
RewriteCond %{HTTPS} !=on
RewriteRule ^ https://%{HTTP_HOST}%{REQUEST_URI} [L,R=301]
- Update Drupal settings:
- Go to Configuration > System > Basic site settings.
- Update the base URL to https://yourdomain.com.
Your Drupal site is now secure and ready for PWA implementation.
Step 2: Install the PWA Module
Drupal offers a Progressive Web App module that simplifies PWA integration.
Installing the PWA Module
- Run the following Composer command:
composer require drupal/pwa
- Enable the module:
drush en pwa -y
- Navigate to Configuration > PWA settings to configure the module.
This module generates a service worker and a manifest file required for PWA functionality.
Step 3: Configure the Web App Manifest
The manifest.json file defines how your PWA appears when installed on a device.
Setting Up manifest.json
Go to Configuration > PWA settings and define:
App Name: “name”: “My Drupal PWA”
Short Name: “short_name”: “DrupalPWA”
Start URL: “start_url”: “/”
Display Mode: “display”: “standalone”
Theme Color: “theme_color”: “#007BFF”
Icons:
“icons”: [
{
“src”: “/sites/default/files/icon-192×192.png”,
“sizes”: “192×192”,
“type”: “image/png”
},
{
“src”: “/sites/default/files/icon-512×512.png”,
“sizes”: “512×512”,
“type”: “image/png”
}
]
This ensures the PWA can be installed on mobile home screens.
Step 4: Implement Service Workers
Service workers enable offline support, caching, and background sync.
Register a Service Worker
In your Drupal theme’s js/service-worker.js file, add:
self.addEventListener(‘install’, (event) => {
event.waitUntil(
caches.open(‘my-drupal-cache’).then((cache) => {
return cache.addAll([
‘/’,
‘/index.html’,
‘/css/style.css’,
‘/js/script.js’,
‘/images/logo.png’
]);
})
);
});
self.addEventListener(‘fetch’, (event) => {
event.respondWith(
caches.match(event.request).then((response) => {
return response || fetch(event.request);
})
);
});
Register in Drupal
Add this to your theme’s scripts.js:
if (‘serviceWorker’ in navigator) {
navigator.serviceWorker.register(‘/js/service-worker.js’)
.then(() => console.log(‘Service Worker Registered’))
.catch((error) => console.log(‘Service Worker Registration Failed’, error));
}
This enables offline caching and speeds up content delivery.
Step 5: Optimize Performance
1. Enable Caching & Compression
- Use Drupal’s built-in caching (Performance > Cache settings).
Enable Gzip compression in .htaccess:
<IfModule mod_deflate.c>
AddOutputFilterByType DEFLATE text/html text/css application/javascript
</IfModule>
2. Implement Lazy Loading
Load images only when they appear in the viewport:
<img src=”placeholder.jpg” data-src=”image.jpg” class=”lazyload”>
3. Use a CDN
Leverage a CDN (Cloudflare, AWS CloudFront) to serve assets faster.
4. Reduce JavaScript and CSS Blocking
- Defer non-critical JS:
<script src=”script.js” defer></script>
- Minify CSS/JS using AdvAgg and Drupal’s Asset Optimization settings.
Step 6: Add Push Notifications (Optional)
To enhance engagement, add push notifications using Firebase Cloud Messaging (FCM):
1. Create a Firebase Project
- Go to Firebase Console
- Set up a new project and enable Cloud Messaging
2. Integrate FCM into Drupal
- Install the web_push module:
composer require drupal/web_push
- Configure Firebase API keys under Configuration > Web Push.
3. Send Push Notifications
self.registration.showNotification(“New Update Available!”, {
body: “Click to refresh your PWA.”,
icon: “/images/notification-icon.png”,
badge: “/images/badge.png”
});
And That’s it everyone you are good to go with this your new website.
Author