How To Install Ansible on Ubuntu, macOS, and Windows

Ansible is an open-source IT automation and configuration management platform designed for tasks like application deployment, provisioning, configuration management, automating daily tasks, improving security, patching systems, and orchestrating workflows. Written in Python, it uses a human-readable YAML language to define tasks.
- Connecting to nodes via OpenSSH.
- Pushing and executing small programs called modules.
- Removing modules after execution.
- Using metadata to control task execution timing and scope.
- Updating remote hosts with security details automatically.
It is commonly used by IT professionals like sysadmins and network managers and is free to use, download, and modify.
Overview & Key Technologies
A comprehensive infrastructure automation solution using Ansible for deploying and managing web applications across multiple environments
Infrastructure: Ansible
Web Stack : Nginx, PHP-FPM, MySQL, Redis, Solr
Security : SSH, Firewall, Fail2ban, SSL
OS Support : Ubuntu, Window, MacOS, Fedora etc.
Ansible Installation Guide: Setup for Ubuntu, macOS, and Windows
This guide provides a detailed walkthrough for installing Ansible on three popular platforms: Ubuntu, macOS, and Windows, ensuring a seamless setup for your automation needs. Whether you’re a seasoned sysadmin or a tech enthusiast, this guide will help you get started with Ansible quickly and efficiently.
Installing Ansible on Ubuntu: Quick and Easy Steps
Ubuntu builds are available in a PPA here. To configure the PPA on your system and install Ansible run these commands:
sudo apt update
sudo apt install software-properties-common
sudo add-apt-repository –yes –update ppa:ansible/ansible
sudo apt install ansible
Installing Ansible on macOS: Using Homebrew
Make sure you install homebrew on MacOS first.
Install Brew use this command
“https://raw.githubusercontent.com/Homebrew/install/HEAD/install.sh)”
brew install ansible
ansible —version
Installing Ansible on Windows: Leveraging WSL
1. Open PowerShell as Administrator and run the following to Enable WSL (Windows Subsystem for Linux). This, by default, will install Ubuntu as your Linux distribution.
Command: wsl –install
2. Install distributions for Linux
Command: wsl –install -d ubuntu
3. Once you have the Linux distribution installed, you will be prompted to create a user account and password.
4. After this, you should now be able to run commands on your WSL Linux Box.
In this example, we installed the Ubuntu Linux distribution and ran the following to install Ansible.
sudo apt update && sudo apt upgrade -y
sudo apt install ansible -y
#Validate Ansible installation
ansible –version
Understanding Ansible Architecture: Components and Workflow
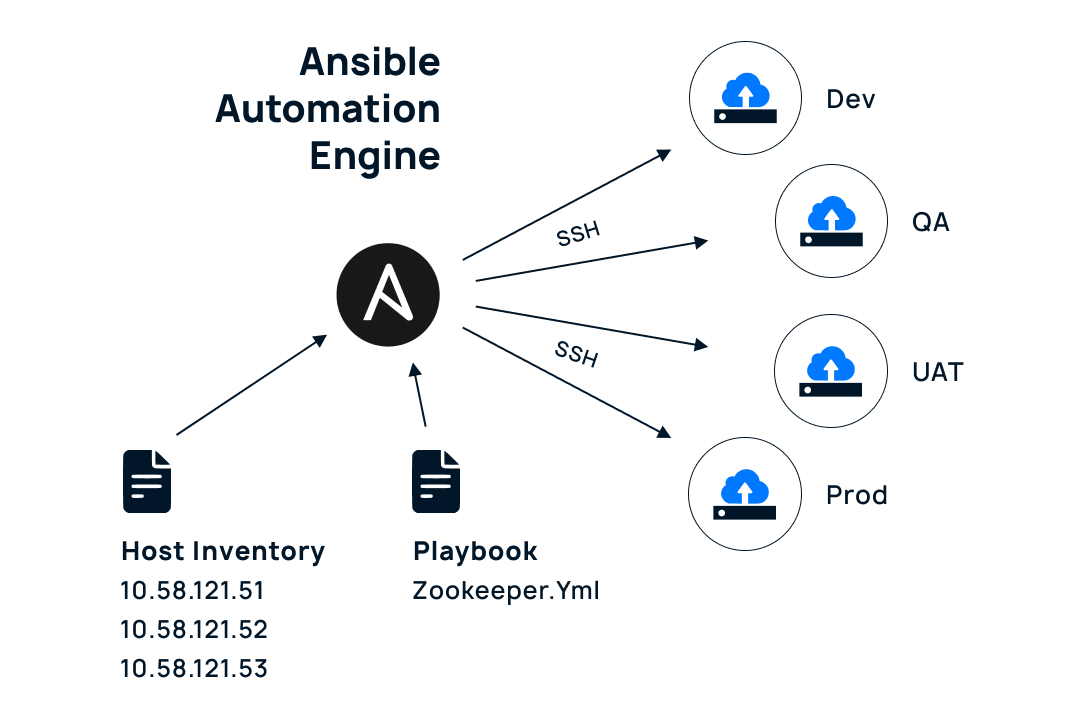
Ansible works like a remote control that:
1. Uses a list of computers (inventory) and instructions (playbook)
2. Connects through SSH to manage 4 environments:
- Dev – for building
- QA – for testing
- UAT – for client testing
- Prod – for real users
Think of Ansible like a manager who has a list of workers (inventory) and a set of instructions (playbook), and it makes sure the same work is done correctly across all four places.
It’s similar to having one remote control (Ansible) that can control multiple TVs (different environments) using the same settings.
Infrastructure Automation With Ansible
A collection of scripts and configurations to set up web servers automatically using Ansible. It handles everything needed for a web application: web server, database, caching, and security.
What You Need
- Ansible (version 2.9 or newer)
- Ubuntu 20.04 or newer servers
- SSH access to your servers
- Python 3
Main Components
- Nginx (web server)
- PHP-FPM
- MySQL (database)
- Redis (caching)
- Security tools
Folder Structure Explained
├── deploy.sh # Main deployment script
├── env/ # Environment settings
│ ├── dev.env # Development settings
│ ├── env.local # Template for settings
│ └── staging.env # Staging settings
├── inventory/ # Server lists
│ ├── dev # Development servers
│ └── staging # Staging servers
├── mysql_import.sh # Database import script
├── playbook/ # Ansible instructions
│ ├── do-firewall.yml # Firewall settings
│ ├── Lamp.yml # Main setup
│ ├── mysql_import.yml # Database setup
│ └── site_deployment.yml # Website setup
├── site_deploy.sh # Website deployment script
├── sql/ # Database files
│ └── backup.sql # Database backup
└── templates/ # Configuration templates
├── demo.conf.j2 # Website config
├── drupal-auth.conf.j2 # Drupal authentication
├── jail.local.j2 # Security config
├── redis.conf.j2 # Cache config
└── ssl.conf.j2 # SSL configuration
How To Use Ansible
This guide covers the steps for setting up environments, configuring servers, and deploying your application using Ansible.
Setup Environment
# Copy environment template
cd env
cp env.local dev.env # For development
# Edit dev.env with your settings
Configure Servers
You will need to specify the server IPs for different environments in the inventory folder.
Go to inventory folder
Add your server IPs in dev or staging files
Deploy the Environment
Once your environment is set up and the server configurations are in place, it’s time to deploy.
# For development
./deploy.sh dev
# For staging
./deploy.sh staging
# For Production
./deploy.sh prod
Deploy the Website
Run the site deployment script for each environment:
./site_deploy.sh dev # For development
./site_deploy.sh staging # For staging
./site_deploy.sh prod # For Production
Import the Database
Import the necessary databases for each environment using the mysql_import.sh script:
# Put your database file in sql folder
./mysql_import.sh dev # For development
./mysql_import.sh staging # For Staging
./mysql_import.sh prod # For Production
Common Ansible Errors and How to Troubleshoot Them
If something goes wrong during the deployment process, here’s how you can check and resolve common issues:
1. Check the Web Server
sudo systemctl status nginx
2. Check the Database
For issues related to the MySQL database, check its service status:
sudo systemctl status mysql
3. Check the Cache
If Redis caching is causing problems, check the Redis service status:
sudo systemctl status redis
Viewing Logs For More Information
Web Server Logs
To check for errors related to Nginx, view the web server logs:
sudo tail -f /var/log/nginx/error.log
Database Logs
To diagnose MySQL-related issues, check the database logs:
sudo tail -f /var/log/mysql/error.log
Cache Logs
For Redis issues, review the cache logs:
sudo tail -f /var/log/redis/redis-server.log
In Conclusion
This infrastructure setup provides a streamlined solution for deploying and managing web applications. With one-command deployment capabilities, it sets up a complete web stack (Nginx, PHP, MySQL, Redis,Solr) across development, staging, and production environments.
Following best practices with secure defaults and organized structure, it acts like a “swiss army knife” for web deployments – turning a bare server into a fully functional web environment. Remember to always test in development before deploying to production. Should you need help, logs are available in /var/log/, and configuration files are easily accessible.
Need expert guidance? Contact LN Webworks today to ensure your deployment process is seamless and efficient!
Author